| Author |
 Topic Topic  |
|
AAA
49 Posts |
 Posted - 06 Sep 2021 : 18:26:30 Posted - 06 Sep 2021 : 18:26:30


|
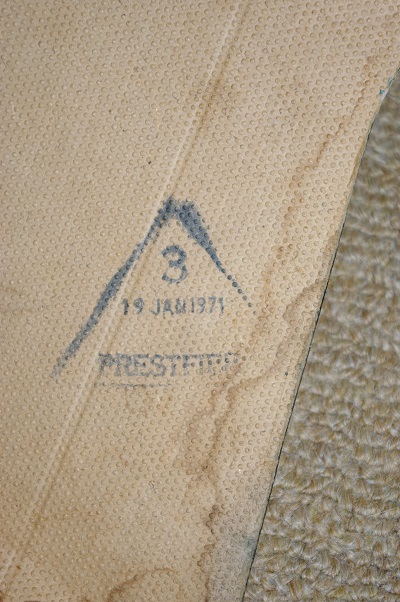
REAR PARCEL SHELF
I am lucky that I still have my original parcel shelf, in good condition too! It has some holes for the fixing screws and cables from the period speaker pods, but this isn't a problem as I am keeping these in the car, (more on the speakers later).
I have given the shelf a good clean. It was getting a little soft around the edges, with the vinyl facing beginning to lift a little, so I saturated the edges with a strong PVA glue solution and held this with bulldog clips whilst it dried. I was careful to ensure that I didn't get any glue on the black facing. This has stiffened the shelf up a lot and should help to prolong its life.
Here, I have finished working along the back and am now starting to work along the side.

What is perhaps not commonly known is that the parcel shelves were almost always date stamped on the back! I have seen a good few over the years, assuming the car still has its original shelf this date is often very close to the build date of the car. According to factory records, my car was built between 19th and 26th February 1971, the shelf is dated 19th January 1971!
|
 |
|
|
Sunbeam-mike
United Kingdom
176 Posts |
Posted - 06 Sep 2021 : 13:09:05
|
Hey, this is pretty good. I'll watch with interest.
Thanks for the Dodo soundstopper info, I'm missing an under bonnet insulation pad.
mike
Mike Hooper |
|
|
|
AAA
49 Posts |
Posted - 03 Sep 2021 : 19:23:53
|
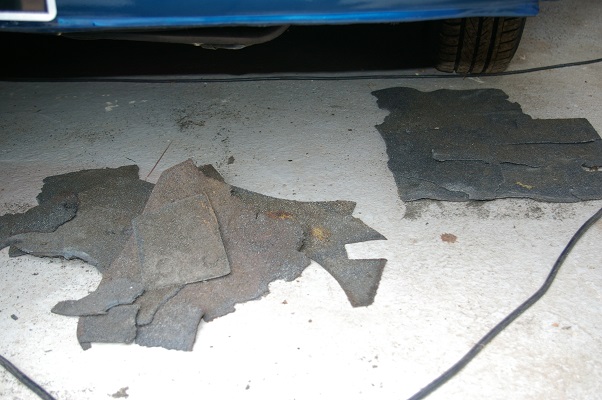
BULKHEAD INSULATION
Something that has been an irritation for years has been the constant crumbs on the front parcel shelf from the crumbling bulkhead insulation. This was originally a three-layer material, with a plastic/rubber membrane sandwiched between two layers of foam. I carefully removed what was left, in the hope that I could use is as a template for the new material.
To replace this, I bought some Dodo soundstopper pro 15mm four layer insulation. This is very similar to the original material just with a addition of a foil layer, and I suspect thicker, (it was impossible to measure the thickness of the original material as the foam had lost all structure and was flattened).
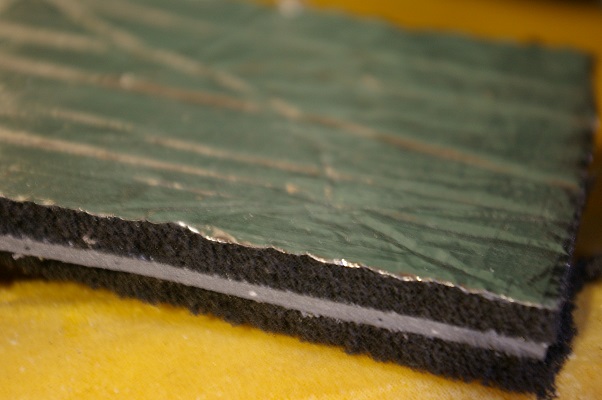
This material was very expensive, (nearly £50 for just enough to make the two sections for the bulkhead).
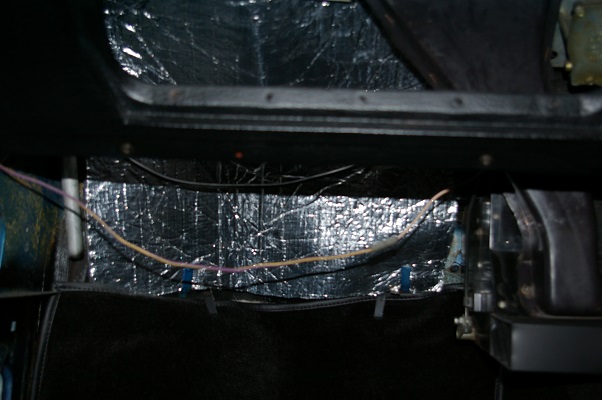
I managed to piece together what was left of the passenger side piece to use this as a template. This fitted perfectly. The driver's side was more difficult as there were quite a lot of pieces missing. I had a look in the 1971 Hunter range parts book, and found that the image of the shapes of the insulation for the rapier shown was remarkably accurate, (although shown the wrong way around in the book). Using this, along with some newspaper, I made a paper pattern.
The car definitely wouldn't take anything thicker than this insulation on the bulkhead! It fits perfectly, but with very little room to spare in places, (especially at the back of the glove box and around the back of the shelf under the dashboard.
|
|
|
|
AAA
49 Posts |
Posted - 02 Sep 2021 : 20:21:15
|
CARPETS
Out with the seats and old carpets! The carpets had been made by the car's owner in the early 1990s in Great Yarmouth. These didn't fit well, and were made from a cheap felt material. When I originally bought the car I had washed these in the washing machine, then spent some time cutting bits off from one place and sewing them onto another to improve the fit. I only intended these as a temporary fix as I had used my money up getting the engine rebuilt and couldn't afford proper replacements...over 20 years ago!

I considered several suppliers for the new carpets, but having read reviews and feedback was not convinced by any of the companies listing carpets for fastbacks. I ended up contacting a company who didn't list the car, but had good feedback. They said they could make them, with a 6 week lead time. I ordered these at a cost of £206 including postage and two additional pieces for the door panels. They arrived on time, but I was initially concerned as they weren't like the original factory carpets. They came as five pieces, one for the kick panel below the rear seat, two for the tunnel and two long sections, one for each side of the tunnel.
With everything out, the floor was still in remarkably good condition with no rust at all. I had stripped this many years ago and painted it with zinc primer and Hammerite, (the old sort you can't get now, which had xylene or something similar as the solvent). The only problem was a crack in the rear outer seat mounting point on the driver's side. Whoever had put the replacement blue seats in had fitted the spacers in the wrong places which had put a lot of stress on the seat runners and floor. I welded the mount, then fitted some new sound deadening pads, (dead mat black, with foil on one side). These initially went in the positions of the original ones, but I then added some extras wherever I found any drumming when tapping over the floor. I cut some strips of felt to bring any pressings up level with the rest of the floor. The odd brown areas are just bits of old insulation.
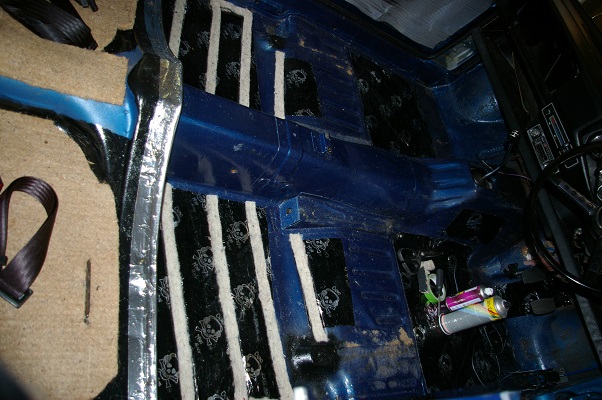
On top of this, I used 1/2" traditional felt with a latex backing, (this adds additional sound proofing and some moisture resistance to protect the floor). Here's the insulation with the first sections of carpet fitted.
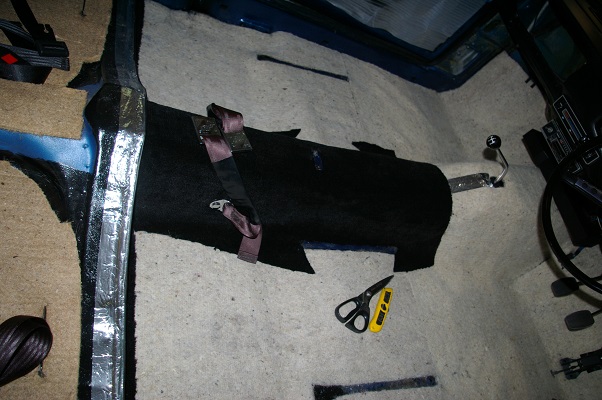
To fit the carpet, the kick panel went in first, I cut this into two pieces to make it easier to fit and glue into place. The rear tunnel section went in next. This fitted perfectly but needed two holes cutting for the seatbelt clips. Next was the front tunnel section, again a perfect fit. Finally the side sections. These were more of a problem. They were both slightly short on the inner sills. I stretched these as much as I dared by fitting the tread strip screws, one at a time from the front, and stretching the carpet as I went. This improved things, but still left a small triangular gap at the back of each sill. I glued some carpet behind in these areas to solve the problem. Wherever there was a chance of any insulation/floor show-through I glued black vinyl or sprayed matt black paint behind. There was no cut-out for either the accelerator pedal or handbrake. The handbrake was easy enough, but for the accelerator pedal I had to cut out a section of carpet and hand-sew in some vinyl edging strip. I also had to cut a small triangle of carpet out on the driver's side and re-stitch the carpet to get rid of a wrinkle. Strangely, there was a cut-out on the passenger's side for the seatbelt mount, but not on the driver's side! The dip is where the seat runner bolts down! I used a spare runner and bolted it to the floor as I fitted each section to check the fit.
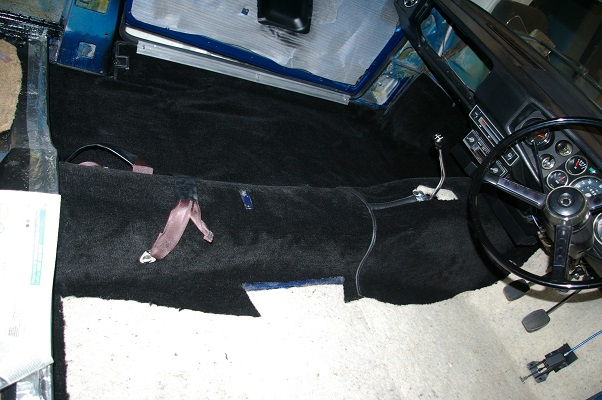
Would I use the carpet supplier again? Yes! The carpet is good quality having a good feel, as is the edging strip used. Expect to spend some time making slight modifications to get a good outcome. Ask for additional carpet for the door panels, (the offcuts are useful for areas like the sills) and ask for them to not include the cut-out for the seatbelt mounts, much easier to punch these yourself! |
|
|
|
Laceyspacey
United Kingdom
12 Posts |
Posted - 02 Sep 2021 : 11:23:05
|
Looking forward to seeing progress looks like a great car
quote:
Originally posted by AAA
I first bought my fastback in the 1990s. It was a high mileage car in electric blue metallic, with matching blue opalescent interior trim, (complete with cigarette burns and splits to the seats). I cleaned the interior up and repaired everything as far as was possible, then used the car for many years. I decided to sell the car in the mid 2000s, but regretted it almost immediately!
After passing through a couple of owners in the south of England, I bought the car back in 2014. When it arrived home it was much the same as it had been when it had left me, just with a few more miles on the clock, a dead battery and...the original interior had gone! It had been replaced with the seats and door panels from a 1968 car, (with the different armrests and side panels) but worse, these were a much lighter shade of blue which really didn't suit the exterior colour at all! It has taken nearly seven years to get hold of enough suitable trim in black to replace the interior. I will add details here over the next few weeks as everything is cleaned up, repaired and fitted. It has turned into a rather larger job than initially anticipated!
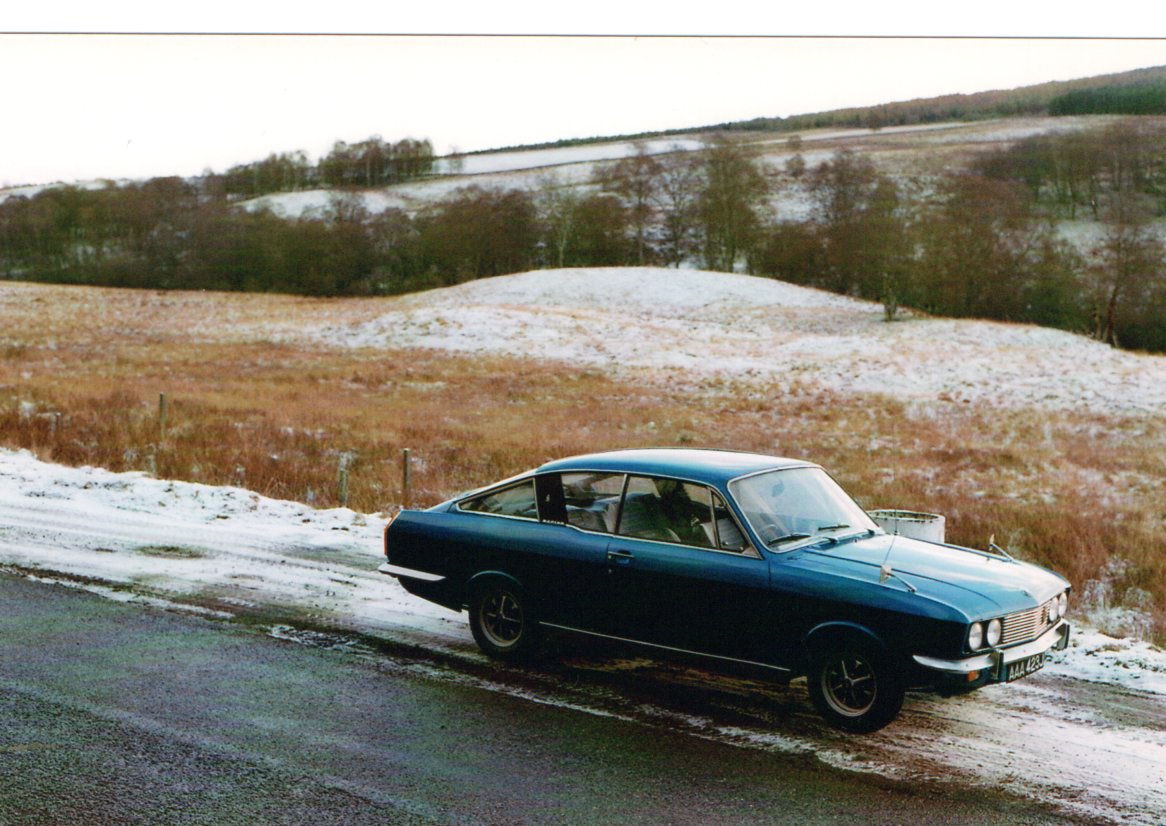
I took this photo of the car on the A9 in Scotland between Perth and Inverness back in the 1990s about a week before Christmas, (complete with its original interior)!
|
|
|
|
AAA
49 Posts |
Posted - 01 Sep 2021 : 14:20:55
|
I first bought my fastback in the 1990s. It was a high mileage car in electric blue metallic, with matching blue opalescent interior trim, (complete with cigarette burns and splits to the seats). I cleaned the interior up and repaired everything as far as was possible, then used the car for many years. I decided to sell the car in the mid 2000s, but regretted it almost immediately!
After passing through a couple of owners in the south of England, I bought the car back in 2014. When it arrived home it was much the same as it had been when it had left me, just with a few more miles on the clock, a dead battery and...the original interior had gone! It had been replaced with the seats and door panels from a 1968 car, (with the different armrests and side panels) but worse, these were a much lighter shade of blue which really didn't suit the exterior colour at all! It has taken nearly seven years to get hold of enough suitable trim in black to replace the interior. I will add details here over the next few weeks as everything is cleaned up, repaired and fitted. It has turned into a rather larger job than initially anticipated!
I took this photo of the car on the A9 in Scotland between Perth and Inverness back in the 1990s about a week before Christmas, (complete with its original interior)!
|
Edited by - AAA on 17 Nov 2022 07:52:20 |
|
|
Topic |
|
|
|