| Author |
 Topic Topic  |
|
AAA
49 Posts |
 Posted - 01 Sep 2021 : 14:20:55 Posted - 01 Sep 2021 : 14:20:55


|
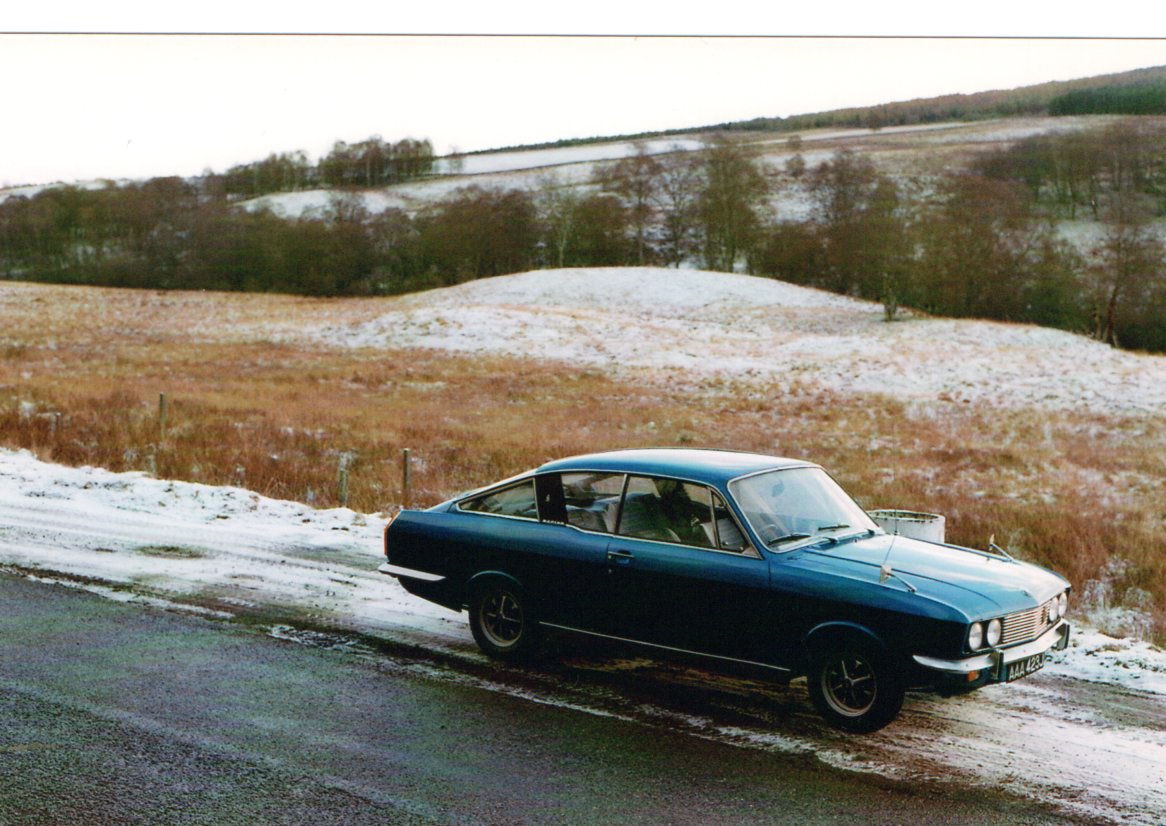
I first bought my fastback in the 1990s. It was a high mileage car in electric blue metallic, with matching blue opalescent interior trim, (complete with cigarette burns and splits to the seats). I cleaned the interior up and repaired everything as far as was possible, then used the car for many years. I decided to sell the car in the mid 2000s, but regretted it almost immediately!
After passing through a couple of owners in the south of England, I bought the car back in 2014. When it arrived home it was much the same as it had been when it had left me, just with a few more miles on the clock, a dead battery and...the original interior had gone! It had been replaced with the seats and door panels from a 1968 car, (with the different armrests and side panels) but worse, these were a much lighter shade of blue which really didn't suit the exterior colour at all! It has taken nearly seven years to get hold of enough suitable trim in black to replace the interior. I will add details here over the next few weeks as everything is cleaned up, repaired and fitted. It has turned into a rather larger job than initially anticipated!
I took this photo of the car on the A9 in Scotland between Perth and Inverness back in the 1990s about a week before Christmas, (complete with its original interior)!
|
Edited by - AAA on 17 Nov 2022 07:52:20 |
|
|
Laceyspacey
United Kingdom
12 Posts |
Posted - 02 Sep 2021 : 11:23:05
|
Looking forward to seeing progress looks like a great car
quote:
Originally posted by AAA
I first bought my fastback in the 1990s. It was a high mileage car in electric blue metallic, with matching blue opalescent interior trim, (complete with cigarette burns and splits to the seats). I cleaned the interior up and repaired everything as far as was possible, then used the car for many years. I decided to sell the car in the mid 2000s, but regretted it almost immediately!
After passing through a couple of owners in the south of England, I bought the car back in 2014. When it arrived home it was much the same as it had been when it had left me, just with a few more miles on the clock, a dead battery and...the original interior had gone! It had been replaced with the seats and door panels from a 1968 car, (with the different armrests and side panels) but worse, these were a much lighter shade of blue which really didn't suit the exterior colour at all! It has taken nearly seven years to get hold of enough suitable trim in black to replace the interior. I will add details here over the next few weeks as everything is cleaned up, repaired and fitted. It has turned into a rather larger job than initially anticipated!
I took this photo of the car on the A9 in Scotland between Perth and Inverness back in the 1990s about a week before Christmas, (complete with its original interior)!
|
 |
|
|
AAA
49 Posts |
Posted - 02 Sep 2021 : 20:21:15
|
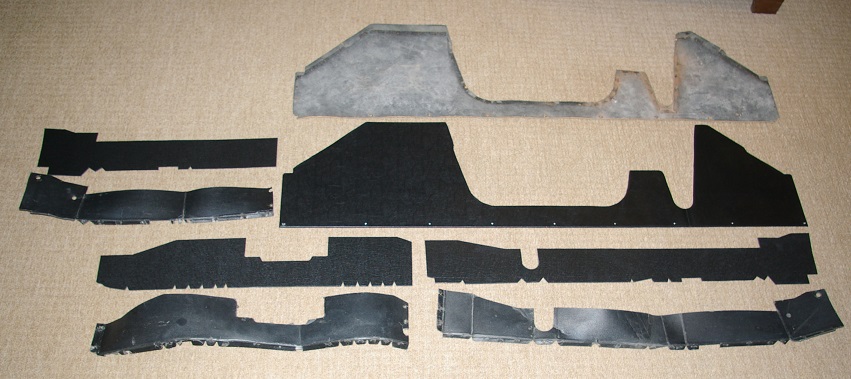
CARPETS
Out with the seats and old carpets! The carpets had been made by the car's owner in the early 1990s in Great Yarmouth. These didn't fit well, and were made from a cheap felt material. When I originally bought the car I had washed these in the washing machine, then spent some time cutting bits off from one place and sewing them onto another to improve the fit. I only intended these as a temporary fix as I had used my money up getting the engine rebuilt and couldn't afford proper replacements...over 20 years ago!

I considered several suppliers for the new carpets, but having read reviews and feedback was not convinced by any of the companies listing carpets for fastbacks. I ended up contacting a company who didn't list the car, but had good feedback. They said they could make them, with a 6 week lead time. I ordered these at a cost of £206 including postage and two additional pieces for the door panels. They arrived on time, but I was initially concerned as they weren't like the original factory carpets. They came as five pieces, one for the kick panel below the rear seat, two for the tunnel and two long sections, one for each side of the tunnel.
With everything out, the floor was still in remarkably good condition with no rust at all. I had stripped this many years ago and painted it with zinc primer and Hammerite, (the old sort you can't get now, which had xylene or something similar as the solvent). The only problem was a crack in the rear outer seat mounting point on the driver's side. Whoever had put the replacement blue seats in had fitted the spacers in the wrong places which had put a lot of stress on the seat runners and floor. I welded the mount, then fitted some new sound deadening pads, (dead mat black, with foil on one side). These initially went in the positions of the original ones, but I then added some extras wherever I found any drumming when tapping over the floor. I cut some strips of felt to bring any pressings up level with the rest of the floor. The odd brown areas are just bits of old insulation.
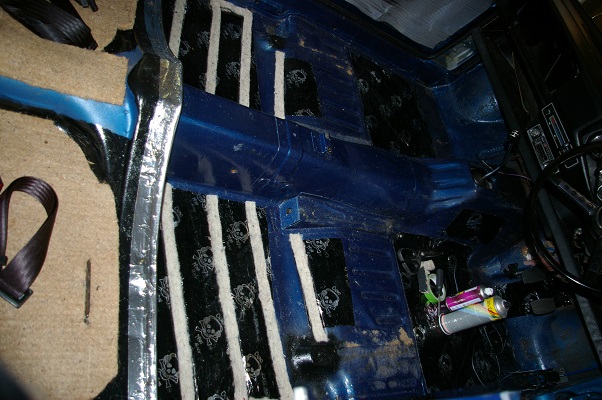
On top of this, I used 1/2" traditional felt with a latex backing, (this adds additional sound proofing and some moisture resistance to protect the floor). Here's the insulation with the first sections of carpet fitted.
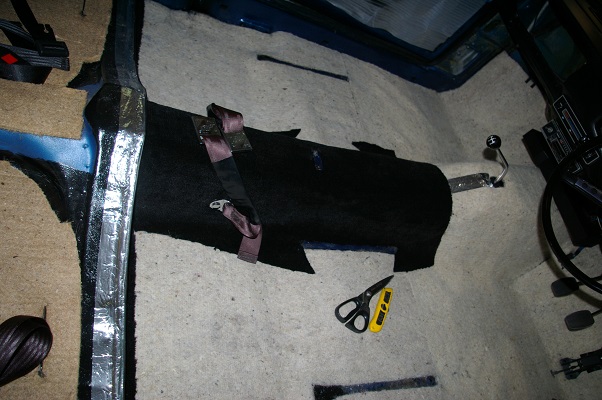
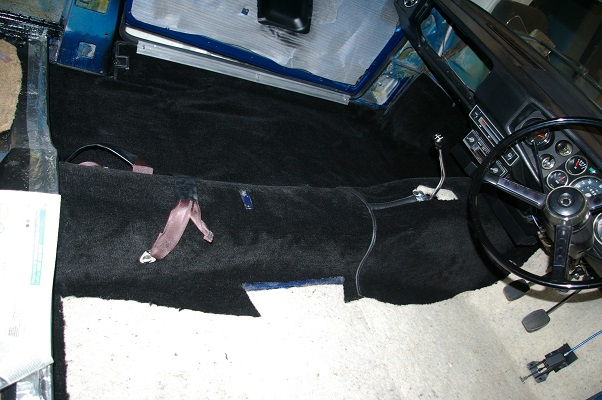
To fit the carpet, the kick panel went in first, I cut this into two pieces to make it easier to fit and glue into place. The rear tunnel section went in next. This fitted perfectly but needed two holes cutting for the seatbelt clips. Next was the front tunnel section, again a perfect fit. Finally the side sections. These were more of a problem. They were both slightly short on the inner sills. I stretched these as much as I dared by fitting the tread strip screws, one at a time from the front, and stretching the carpet as I went. This improved things, but still left a small triangular gap at the back of each sill. I glued some carpet behind in these areas to solve the problem. Wherever there was a chance of any insulation/floor show-through I glued black vinyl or sprayed matt black paint behind. There was no cut-out for either the accelerator pedal or handbrake. The handbrake was easy enough, but for the accelerator pedal I had to cut out a section of carpet and hand-sew in some vinyl edging strip. I also had to cut a small triangle of carpet out on the driver's side and re-stitch the carpet to get rid of a wrinkle. Strangely, there was a cut-out on the passenger's side for the seatbelt mount, but not on the driver's side! The dip is where the seat runner bolts down! I used a spare runner and bolted it to the floor as I fitted each section to check the fit.
Would I use the carpet supplier again? Yes! The carpet is good quality having a good feel, as is the edging strip used. Expect to spend some time making slight modifications to get a good outcome. Ask for additional carpet for the door panels, (the offcuts are useful for areas like the sills) and ask for them to not include the cut-out for the seatbelt mounts, much easier to punch these yourself! |
|
|
|
AAA
49 Posts |
Posted - 03 Sep 2021 : 19:23:53
|
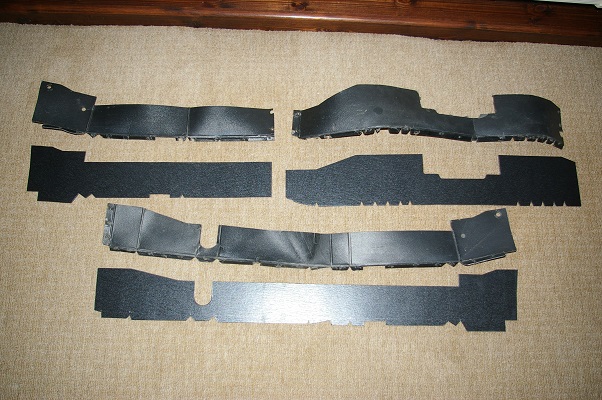
BULKHEAD INSULATION
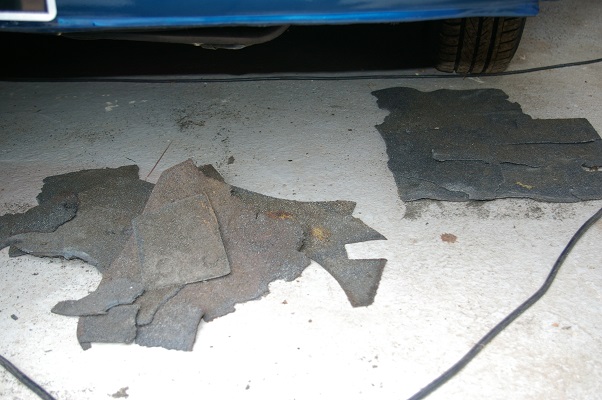
Something that has been an irritation for years has been the constant crumbs on the front parcel shelf from the crumbling bulkhead insulation. This was originally a three-layer material, with a plastic/rubber membrane sandwiched between two layers of foam. I carefully removed what was left, in the hope that I could use is as a template for the new material.
To replace this, I bought some Dodo soundstopper pro 15mm four layer insulation. This is very similar to the original material just with a addition of a foil layer, and I suspect thicker, (it was impossible to measure the thickness of the original material as the foam had lost all structure and was flattened).
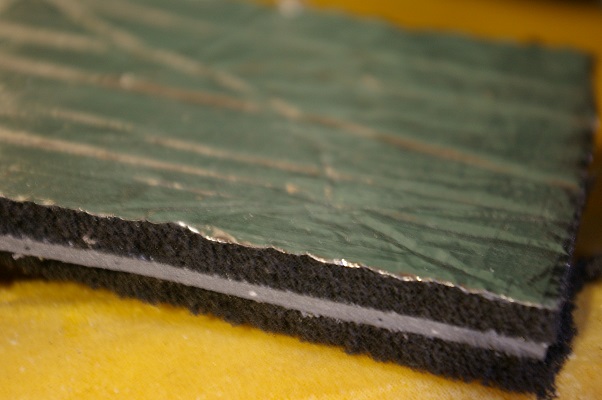
This material was very expensive, (nearly £50 for just enough to make the two sections for the bulkhead).
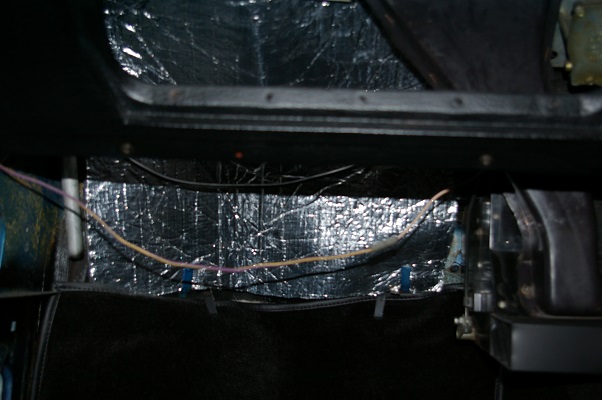
I managed to piece together what was left of the passenger side piece to use this as a template. This fitted perfectly. The driver's side was more difficult as there were quite a lot of pieces missing. I had a look in the 1971 Hunter range parts book, and found that the image of the shapes of the insulation for the rapier shown was remarkably accurate, (although shown the wrong way around in the book). Using this, along with some newspaper, I made a paper pattern.
The car definitely wouldn't take anything thicker than this insulation on the bulkhead! It fits perfectly, but with very little room to spare in places, (especially at the back of the glove box and around the back of the shelf under the dashboard.
|
|
|
|
Sunbeam-mike
United Kingdom
176 Posts |
Posted - 06 Sep 2021 : 13:09:05
|
Hey, this is pretty good. I'll watch with interest.
Thanks for the Dodo soundstopper info, I'm missing an under bonnet insulation pad.
mike
Mike Hooper |
|
|
|
AAA
49 Posts |
Posted - 06 Sep 2021 : 18:26:30
|
REAR PARCEL SHELF
I am lucky that I still have my original parcel shelf, in good condition too! It has some holes for the fixing screws and cables from the period speaker pods, but this isn't a problem as I am keeping these in the car, (more on the speakers later).
I have given the shelf a good clean. It was getting a little soft around the edges, with the vinyl facing beginning to lift a little, so I saturated the edges with a strong PVA glue solution and held this with bulldog clips whilst it dried. I was careful to ensure that I didn't get any glue on the black facing. This has stiffened the shelf up a lot and should help to prolong its life.
Here, I have finished working along the back and am now starting to work along the side.

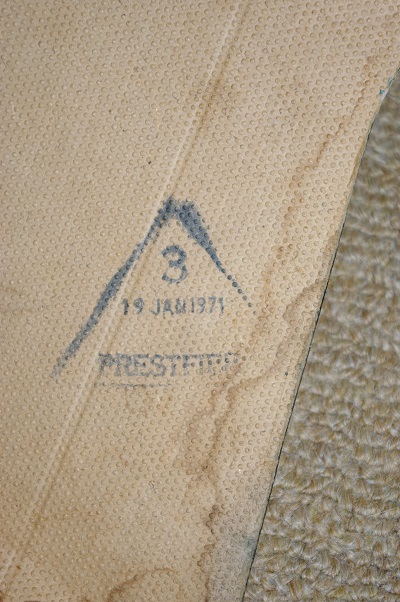
What is perhaps not commonly known is that the parcel shelves were almost always date stamped on the back! I have seen a good few over the years, assuming the car still has its original shelf this date is often very close to the build date of the car. According to factory records, my car was built between 19th and 26th February 1971, the shelf is dated 19th January 1971!
|
|
|
|
AAA
49 Posts |
Posted - 06 Sep 2021 : 19:01:19
|
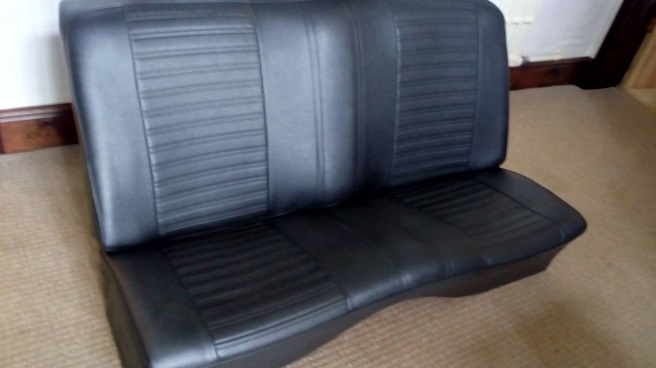
REAR SEAT
I was quite lucky here! I had managed to get a very good rear seat, with very little damage.
The base was in excellent condition, just needing a good clean. I cleaned up the spring unit underneath with a wire brush, and some small brushes in the rotary tool, finishing this with a few passes with a spray can. I cleaned the seat cover with cream cleaner and a scrubbing brush, followed by a soap solution and left it to dry in the sun. The cover had a few dents from storage, I gently heated these areas with a heat gun, they all smoothed out well.
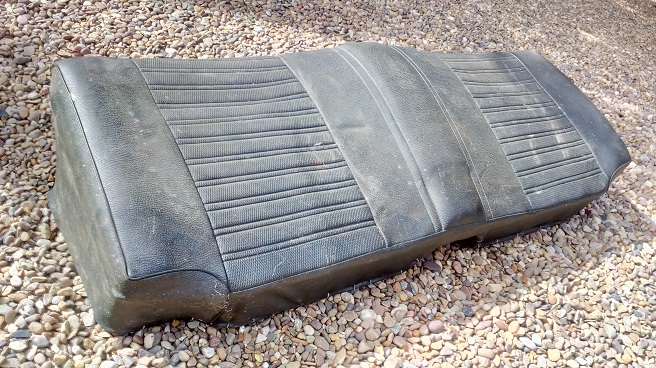
The backrest was given the same treatment, but had a small area of stitching that had failed along the bottom edge, (normally they go along the top edge when they are exposed to the sun, but this one was fine in this area).
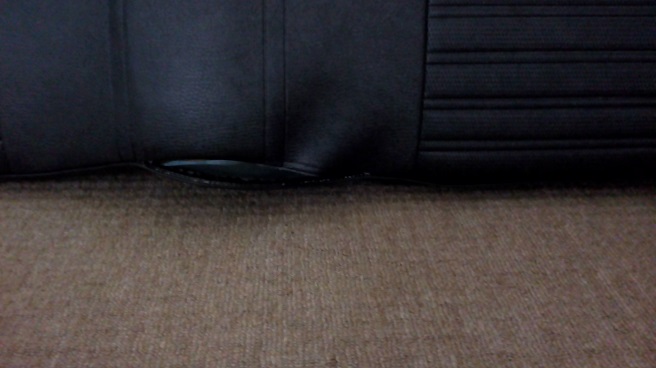
After a little more investigation, I found that the whole bottom edge needed sewing. I released the hog rings along the bottom edge and half way up each side. I was then able to peel the cover back. I hand-stitched the cover back together, using the original stitching holes and a pair of pliers to pull the needle through each time. Once all was done, I put the cover back in place and reattached it to the frame. I haven't used any additional products on the seat, just a good clean!
Something I would definitely recommend is the thread I have used throughout, IPCABOND bonded nylon thread 30s. This is the same thickness as that used originally. I haven't managed to break this yet, (although I have broken several needles, and cut through my own finger with it). It is supposedly rot proof and UV proof! |
|
|
|
AAA
49 Posts |
Posted - 08 Sep 2021 : 20:19:23
|
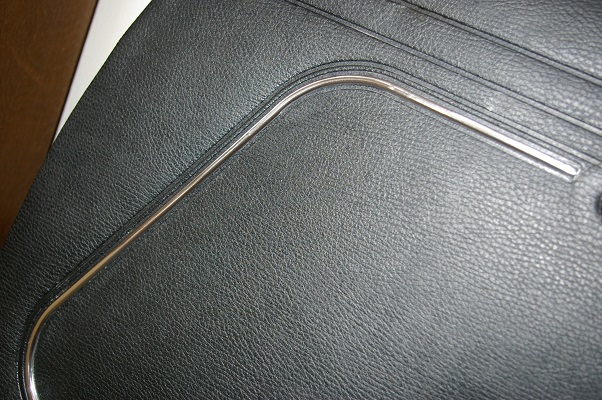
DOOR & REAR QUARTER PANELS
I had been given one set of side panels, with one additional driver's door panel.

The rear quarters were in generally good condition. These were cleaned in the same way as the rear seat. They had a couple of small splits, I strengthened these from behind using aluminium tape, (which is very thin and very sticky). I then glued the edges with PVA, holding these in position with masking tape to dry overnight. I used a very small amount of heavy duty leather and vinyl filler where needed. One panel had several small pin holes, (possibly caused years ago by welding spatter) these were repaired in the same way. I replaced the waist seal with new. These are narrower than those commonly used, but Woolies have the correct type available. The bends are easy to put in by hand. I replaced the plastic retaining clips, (most were missing or broken).
The door panels were quite warped. After cleaning, I saturated the backs with hot water and pressed the panels between two pieces of woodblock worktop I had in the garage, piling a couple of toolboxes on top. I put an offcut of vinyl flooring in to protect the visible face of each panel. I left them for three days, then removed them and laid them flat for any remaining moisture to dry off for a couple more days. I repaired any small nicks/splits using aluminium tape and leather filler. The carpet sections were carefully unstitched using a scalpel to cut through the thread. The bottom edge is made from fabric-strengthened vinyl, but the rest of the panel is very thin and fragile vinyl with no strengthening, extra care was needed along the top edge of the carpet. I cut new carpet and stitched this in by hand, using the original stitching holes in the vinyl so as not to weaken it. I then used spray glue to fix the carpet to the hardboard panel and stapled the edges back over using staples with very short legs, (the same as the originals).
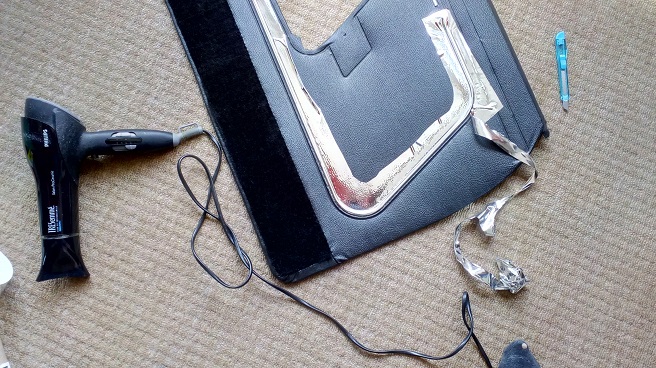
The next challenge was to improve the chrome bands on the panels. These were dull is some places and peeling in others. Firstly, I tried using wide chrome stripe tape, ordered cheaply from China. This went on well, (on the third attempt) and bent around the curves well with a little heat. I then trimmed off the excess along the edges. A couple of hours later, the trial section had lifted off! This wasn't due to poor surface preparation, as the glue from the stripe tape was left behind on the panel, with none on the tape! I assumed the problem was down to poor quality tape, so ordered some from a UK supplier at three times the price...exactly the same thing happened again! Third time lucky...
I ordered a sheet of chrome vinyl wrap, the best sort I could find with an 8 year guarantee for exterior use! I cut this roughly to shape, and using gentle heat this pressed neatly over and around the edges and curves. I then careful cut along the edges with a sharp craft knife. With the cut started, a little tension on the end of the piece to be cut off and the lightest pressure on the knife left a neat and accurately cut edge. This material has stayed firmly in place. The surface has to be completely clean, with any peeling old material or roughness removed, as the wrap is very thin and any discrepancies in the surface show through.
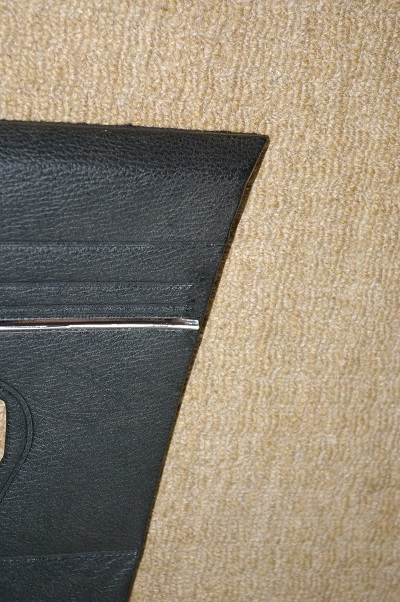
The two driver's door panels I had both had damage on their rear edges, in the same places. There was a missing area of vinyl, with a ragged edge.
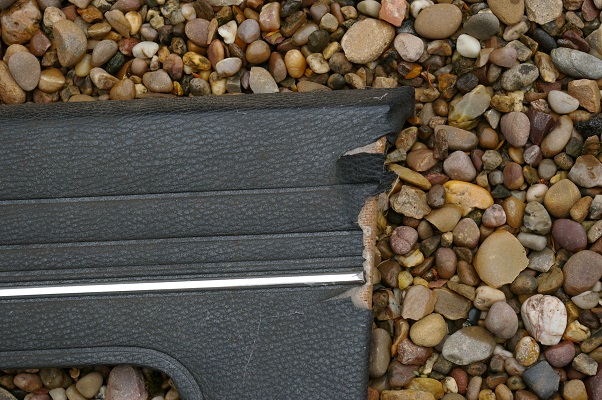
I used vinyl cut from the rear of the panel to repair this area, (there is quite a bit available on the backs where the final trimming of the material in the factory was not done very neatly). I put the replacement piece under the damage, then cut a half-moon shape through both the ragged edge and the new material underneath. This gave a neat butt joint. I fixed this together with aluminium tape and PVA glue, then a little leather filler. The filler dries matt, so in places the join was just visible. I used a little enamel lacquer with a fine paintbrush to match the graining across the filler, then stippled this with a moistened finger before it dried to take the gloss off.
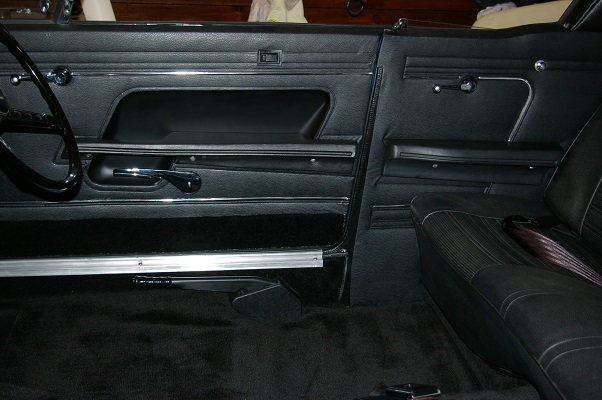
New clips and waist seals finished the door panels.
The panels were fitted into the car. The rear quarters were slightly too deep, due to the new carpet and sound deadening. I cut a small strip of sound deadening out on each side before putting the carpet back over, this gave the panels enough clearance to drop and clip into place.
|
Edited by - AAA on 09 Sep 2021 09:38:09 |
|
|
|
AAA
49 Posts |
Posted - 10 Sep 2021 : 19:47:37
|
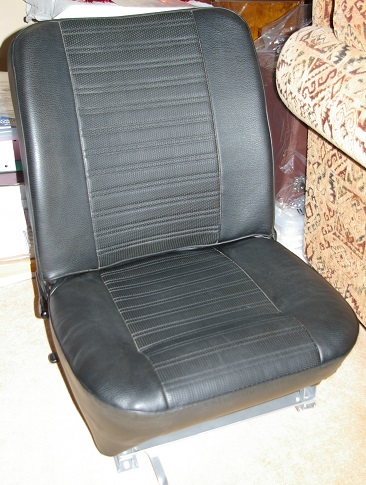
FRONT SEATS
I had managed to get hold of four front seats. All had damaged covers and failed rubber diaphragms. One seat had been professionally repaired at some point in the past, with some parts replaced with a different type of vinyl.
I stripped all four seats back to the frames. The frames were rusty and the foam cushions were breaking up.
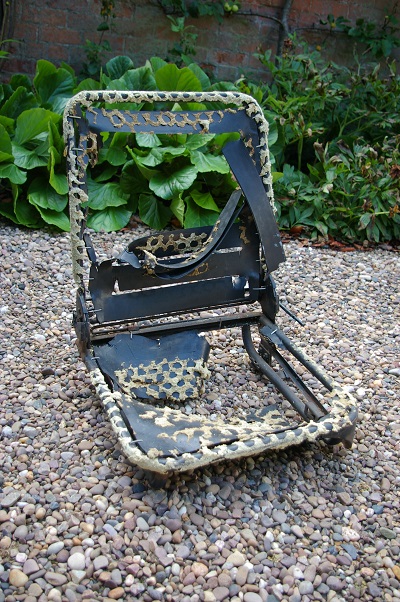
I selected what appeared to be the best pair of frames. These were de-rusted and cleaned back to bare metal. I found one frame to be cracked, so this was welded. I then sprayed the prepared frames with anti-rust primer, black primer and several coats of black satin finish Hammerite.
All of the covers were damaged. I unpicked most of the stitching and used sections from all four seats to make up a full set of covers. I cleaned and repaired any slight damage on each section before stitching everything together. I strengthened the edges of the covers, (where they are clipped over the frames) using a pre-glued iron-on fabric tape. Making up the covers was a slow job, taking a number of evenings to complete.
None of the seat foams were useable. They were leaving crumbs, were hard and brittle in places, and were covered in old glue. I bought new 6" thick blocks of high density upholstery foam, choosing a foam which was slightly firmer than the original, (as I suspect the originals have lost some of their structure).
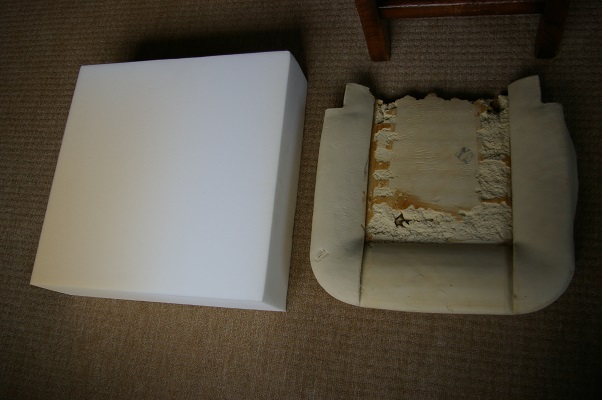
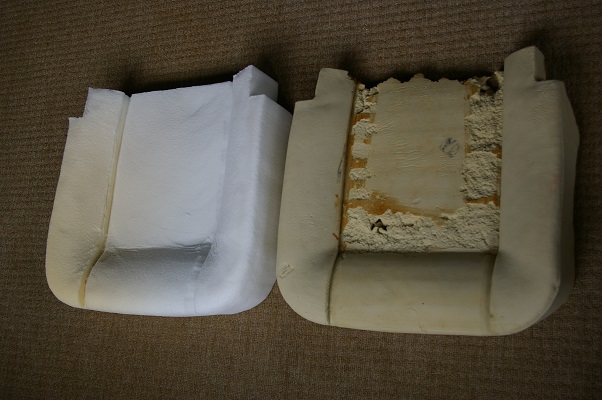
Using the best survivors as templates, I marked out the shapes with a felt pen, making the new foam slightly bigger but also measuring the insides of the covers to be sure. Using an electric carving knife I cut the foams roughly to shape, being careful not to remove too much material.
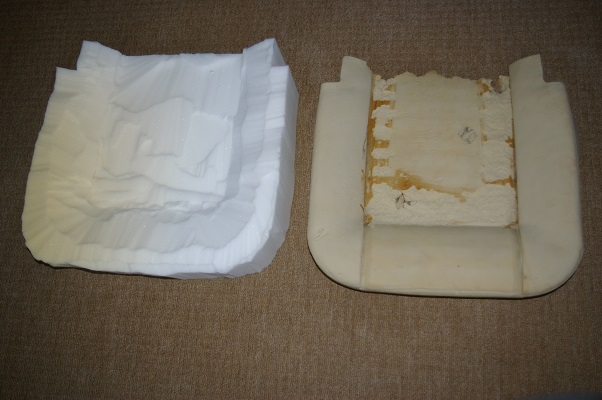
The foam was then finished using a large box cheese grater, (finest side) and a rubber-backed fine sanding disc in the electric drill. I tried using a coarse sanding disc, but this had a tendency to grab and snatch at the foam. Each foam took about two hours to shape from start to finish.
I replaced the seat diaphragms with Pirelli webbing, (the wider 2" heavy duty type). I made use of as many existing holes in the frames as possible so as to limit how many additional holes had to be drilled. I used a gasket punch for the end staples to ensure a neat hole in the webbing and reduce any chance of the end staples pulling through. The straps have to be made shorter and stretched into position.
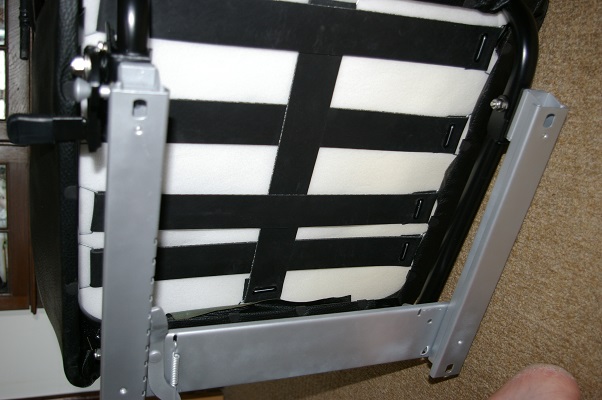
Originally, the seats were assembled using large quantities of glue. I reassembled them using glue only where necessary to make them easier to repair in the future. I avoided using glue on the covers, pulling the shaping in using loops of thread passed through the seat foams and tied behind through thin plastic spreader plates. These are hidden behind the Pirelli straps. I replaced all of the four-prong cover retaining clips with a two-prong type, again making it easier to take the seats apart in the future. These also do much less damage to the edges of the covers when removed.
According to the workshop manual the seat runners cannot be taken apart for service and repair, this isn't true! By bruising down the pressing on the inside of each runner at the back, they slide apart. Inside each are two steel rollers, each with two rubber tyres. I cleaned these up, removing a lot of dirt and old grease. When reassembling, grease only needs to be applied to the sides where the rollers can rub and the very edges of the top runner, the rest can be left dry. The various plastic knobs and lever finishers were cleaned, with any roughness or scratches removed using abrasive paper. These were then polished and refitted. I put the seats to one side rather than fitting them to the car so as to make it easier to work on the dashboard. |
Edited by - AAA on 10 Sep 2021 19:49:02 |
|
|
|
Panky
United Kingdom
70 Posts |
Posted - 10 Sep 2021 : 21:09:33


|
Really enjoying this thread and admire your skills and inprovisation techniques - cheese grater, who would have thought of that . Some superb results being produced. . Some superb results being produced. |
|
|
|
AAA
49 Posts |
Posted - 11 Sep 2021 : 19:17:44
|
| Thanks very much for the kind and positive comments and PMs I have received. I hope this is of interest, plenty more to come! |
|
|
|
AAA
49 Posts |
Posted - 11 Sep 2021 : 19:56:03
|
GLOVE BOX
The original glove boxes are made of millboard held together with bifurcated rivets. Mine was tatty and out of shape. I considered using the hot water and clamping approach followed by a vinyl paint finish, I also considered making a new one from millboard, (more on millboard later). I ruled both of these ideas out, deciding to try to improve on the original design and construction.
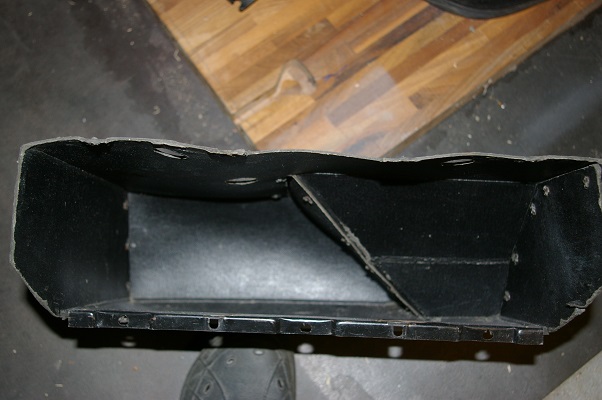
Amongst the various parts I had collected was a wrecked glove box, with a large tear in it, (so it was not really of use to anyone). I pulled this apart and laid it flat to use as a template. I cut fresh material from sheet steel, folding this to the correct shape. I plug welded this from behind, forming a (very) rigid structure of the correct shape and size. I sprayed this matt black. I applied a sound deadening pad to the back.
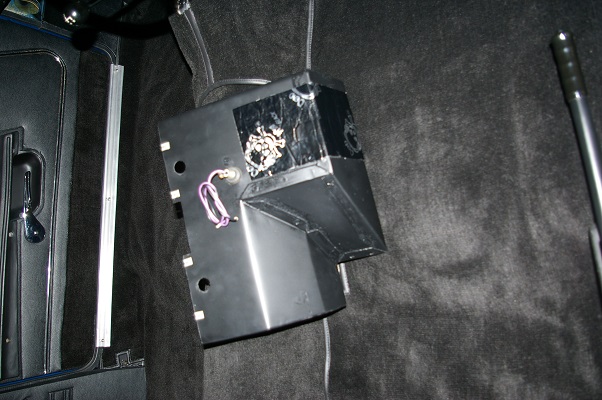
For the interior, I used a special black-coloured glue and fine nylon flock. Once this was completely dry I vacuumed it out, leaving a smooth and soft surface. I riveted the original metal rail onto the front edge. As my car is a relatively early fastback, it originally had the larger glove box lamp with glass lens and chrome hood, (from around 1972 these were replaced with a smaller lamp with exposed bulb and no lens or hood). My original lamp was hanging out as the rubber had perished. Fortunately, some years ago I had bought a replacement from Speedy Spares but never fitted it. I fitted this to the new glove box.
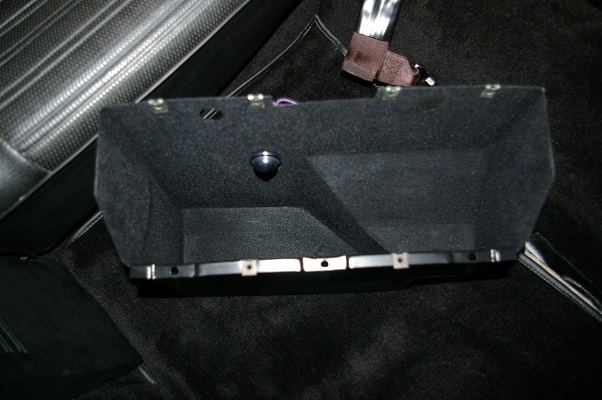
As the glove box lid was out of the car, I removed the inner metal section complete with hinge. This was sprayed satin black. I also sprayed some new stainless flange head screws matt black and fitted everything back into the dashboard. I think this is an improvement on the original design and very sturdy, without looking out of place!

|
Edited by - AAA on 13 Sep 2021 11:17:12 |
|
|
|
AAA
49 Posts |
Posted - 13 Sep 2021 : 19:05:30
|
FRONT PARCEL SHELF
I had made a replacement parcel shelf when I first bought the car, but I was never completely satisfied with it! The folds on the back section weren't as neat as I would have liked, and it had broken up around the steering column and warped over the last twenty-odd years.
The original shelf has a faced hardboard base with faced millboard at the back, held together by rivets and staples. Millboard is available from both Woolies and Martrim, and although it looks the same as the original material, it is about twice as thick.
I started by taking a ruined factory-original shelf apart. I used the pieces as templates to firstly cut the millboard sections for the rear of the shelf. The millboard is very tough! A jigsaw does not leave a neat edge, so I cut through it using a Stanley knife. Each cut took eight firm passes with the knife. The tip of the blade wore out quickly, so I replaced the blade several times.
When I attempted this years ago, I had used hardboard for the base. This time, I used birch three ply, covering this with black vinyl folded over the front edge and ends but cut flush with the edge of the plywood at the rear.
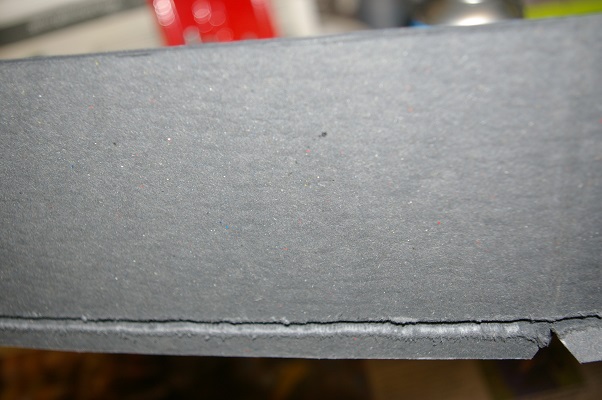
On my previous attempt, I had scored the millboard to create the folds, but I was never happy with the result. The original millboard appears to have been put in a press of some sort to stretch the material at each bend. I experimented with offcuts, trying various methods to create the same effect. For the forward bends, (all of the vertical folds other than the one each side of the steering column) I finally settled on using a steel bar and two pieces of softwood in the vice. I found that by clamping the bar and millboard between the pieces of wood, winding on 3/4 of a turn on the vice created a suitable dent in the rear of the millboard without damaging it. With the bar removed, I positioned the millboard between the blocks of wood at the position of the centre of the fold and gently worked the material over. This created a neat bend with no damage to the front face. I used the same method for the bends at the end of the shelf where the material bends up under the ends of the shelf.
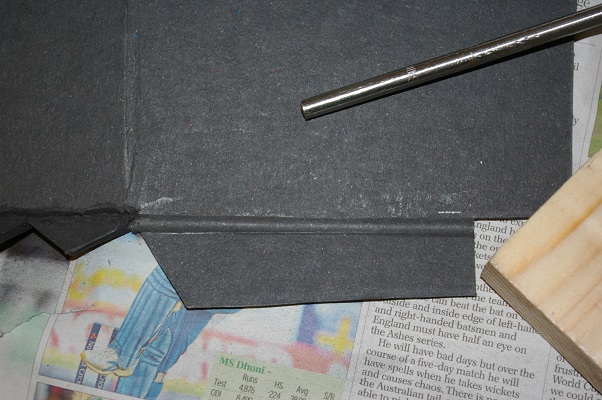
The rearward bends were more of a challenge! I tried the same approach using the bar, but any attempt to work on the front of the material left unsightly marks. It also caused the material to delaminate wherever it was near to the cut edge. There is a rearward bend all the way along the bottom of the back edge, and either side of the steering column, (these bends are especially close to the cut edge, with only a very narrow strip of millboard between the fold and the column).
Next I tried using a small cutting disc in the rotary tool to create a V-shape cut out along the back of the fold, but this was inconsistent in depth and created a lot of smoke. I finally settled on a 90 degree v-shaped router bit, fitted in the pillar drill with the table wound up. With newspaper taped to the drill bed to protect the front face, and after several trials to determine an appropriate cut depth and method, I passed the millboard freehand through the drill, cutting a v-shaped groove along the back of each fold. This method worked well, leaving a cut of consistent depth. It left slightly fluffy edges, which bothered me initially, but these turned out to be beneficial later on.
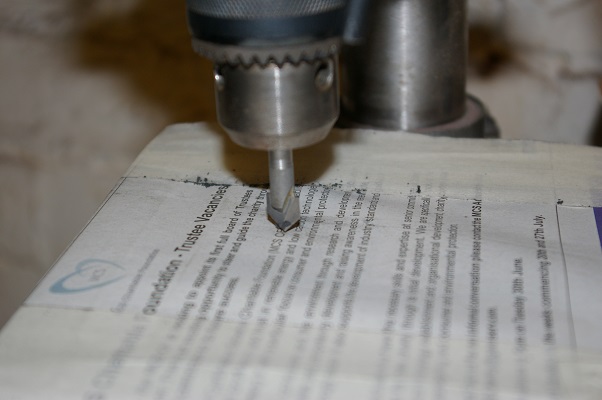
The cut is about half way through the material. As the material is twice the thickness of the original, it should be at least as strong as the folds on an original shelf at this stage.
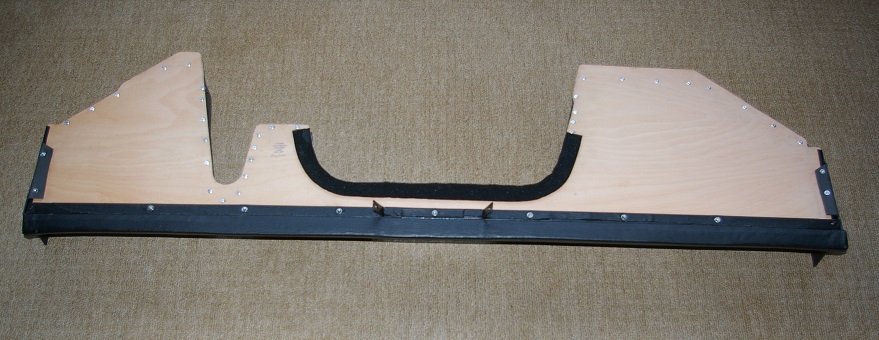
Having cleaned up and repaired a couple of splits and rubs to the original padded rail, I riveted this to the base of the shelf, but left the back off. I fitted the base and rail to the car, and using a setsquare and masking tape, accurately marked the positions of the steering column and radio so as to position the back as accurately as possible.
With the base removed from the car, I started to fit the rear sections. Each was held in place, drilled through and pop-riveted from underneath the shelf, using a washer on the back of each rivet. I did most of this on my own, but it would be much easier with a second pair of hands! I took extra care to make sure the cut outs for the radio and steering column were in the correct places.
As a final step, just to be sure I ran a bead of neat PVA glue along the entire fold at the back of the shelf, into the v-shaped groove. The fluffy edges here helped to absorb the glue and tie the edges together. I did the same down the back of the grooves cut for the folds next to the steering column cut out. This was then left to dry overnight.
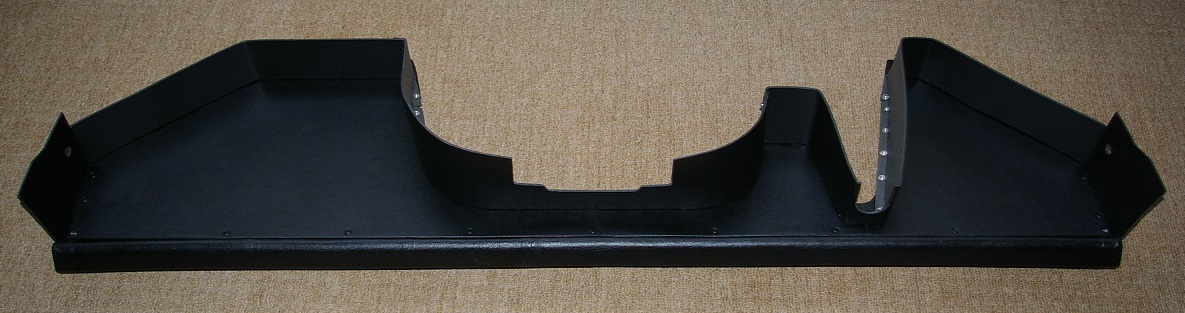
All visible rivet heads were sprayed matt black before fitting and touched in after fitting where the rivet gun had rubbed the centre of each. I used 4mm x 12mm aluminium rivets throughout with spreader washers. The finished item is extremely rigid!
|
Edited by - AAA on 16 Sep 2021 11:12:47 |
|
|
|
Laceyspacey
United Kingdom
12 Posts |
Posted - 15 Sep 2021 : 16:59:12
|
Some great tips here thank you I will buy some of that webbing for my front seats......
quote:
Originally posted by AAA
FRONT SEATS
I had managed to get hold of four front seats. All had damaged covers and failed rubber diaphragms. One seat had been professionally repaired at some point in the past, with some parts replaced with a different type of vinyl.
I stripped all four seats back to the frames. The frames were rusty and the foam cushions were breaking up.
I selected what appeared to be the best pair of frames. These were de-rusted and cleaned back to bare metal. I found one frame to be cracked, so this was welded. I then sprayed the prepared frames with anti-rust primer, black primer and several coats of black satin finish Hammerite.
All of the covers were damaged. I unpicked most of the stitching and used sections from all four seats to make up a full set of covers. I cleaned and repaired any slight damage on each section before stitching everything together. I strengthened the edges of the covers, (where they are clipped over the frames) using a pre-glued iron-on fabric tape. Making up the covers was a slow job, taking a number of evenings to complete.
None of the seat foams were useable. They were leaving crumbs, were hard and brittle in places, and were covered in old glue. I bought new 6" thick blocks of high density upholstery foam, choosing a foam which was slightly firmer than the original, (as I suspect the originals have lost some of their structure).
Using the best survivors as templates, I marked out the shapes with a felt pen, making the new foam slightly bigger but also measuring the insides of the covers to be sure. Using an electric carving knife I cut the foams roughly to shape, being careful not to remove too much material.
The foam was then finished using a large box cheese grater, (finest side) and a rubber-backed fine sanding disc in the electric drill. I tried using a coarse sanding disc, but this had a tendency to grab and snatch at the foam. Each foam took about two hours to shape from start to finish.
I replaced the seat diaphragms with Pirelli webbing, (the wider 2" heavy duty type). I made use of as many existing holes in the frames as possible so as to limit how many additional holes had to be drilled. I used a gasket punch for the end staples to ensure a neat hole in the webbing and reduce any chance of the end staples pulling through. The straps have to be made shorter and stretched into position.
Originally, the seats were assembled using large quantities of glue. I reassembled them using glue only where necessary to make them easier to repair in the future. I avoided using glue on the covers, pulling the shaping in using loops of thread passed through the seat foams and tied behind through thin plastic spreader plates. These are hidden behind the Pirelli straps. I replaced all of the four-prong cover retaining clips with a two-prong type, again making it easier to take the seats apart in the future. These also do much less damage to the edges of the covers when removed.
According to the workshop manual the seat runners cannot be taken apart for service and repair, this isn't true! By bruising down the pressing on the inside of each runner at the back, they slide apart. Inside each are two steel rollers, each with two rubber tyres. I cleaned these up, removing a lot of dirt and old grease. When reassembling, grease only needs to be applied to the sides where the rollers can rub and the very edges of the top runner, the rest can be left dry. The various plastic knobs and lever finishers were cleaned, with any roughness or scratches removed using abrasive paper. These were then polished and refitted. I put the seats to one side rather than fitting them to the car so as to make it easier to work on the dashboard.
|
|
|
|
AAA
49 Posts |
Posted - 15 Sep 2021 : 19:19:41
|
DASHBOARD VENTS
The dashboard vents are held in place with two screws. These can be easily removed after pulling the air hose off the back.
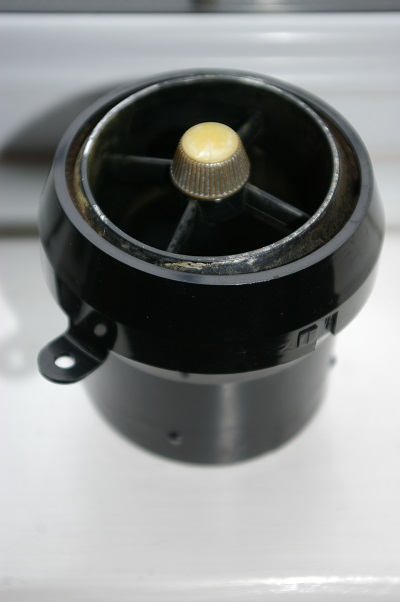
The first job was to remove the eyeball part for refinishing. Two types of socket were used. Early cars have a pressed steel socket, held together with two rivets. Around 1970 these were changed to a plastic socket which twists together over two plastic lugs. The plastic type were glued using cyanoacrylate at each lug. The steel sockets are easy to dismantle by drilling out the rivets. The plastic type can be separated by carefully inserting the tip of a thin knife under the plastic around the lugs and cracking the glue, care is needed here to avoid breaking the plastic! I tried various methods to separate these.
An early-type vent out of my collection of spares.
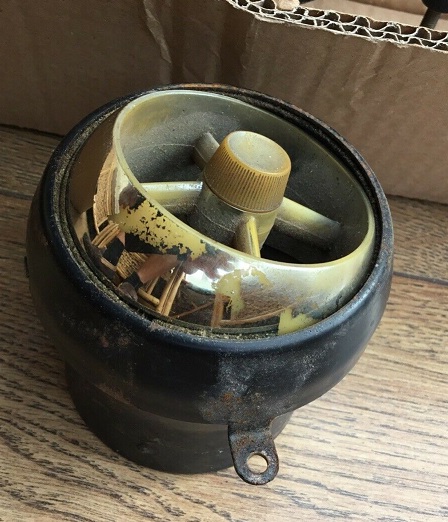
A vent socket out of my car.

Once the eyeball part is out the butterfly valve can be removed by unscrewing the two small screws from each end of it and pulling the valve out to the rear. The central knob is held in place using a recessed star washer. This is hard to get at. I used a curved needle, prising up each tab in turn and working around, slowly walking the washer off the knob spindle.
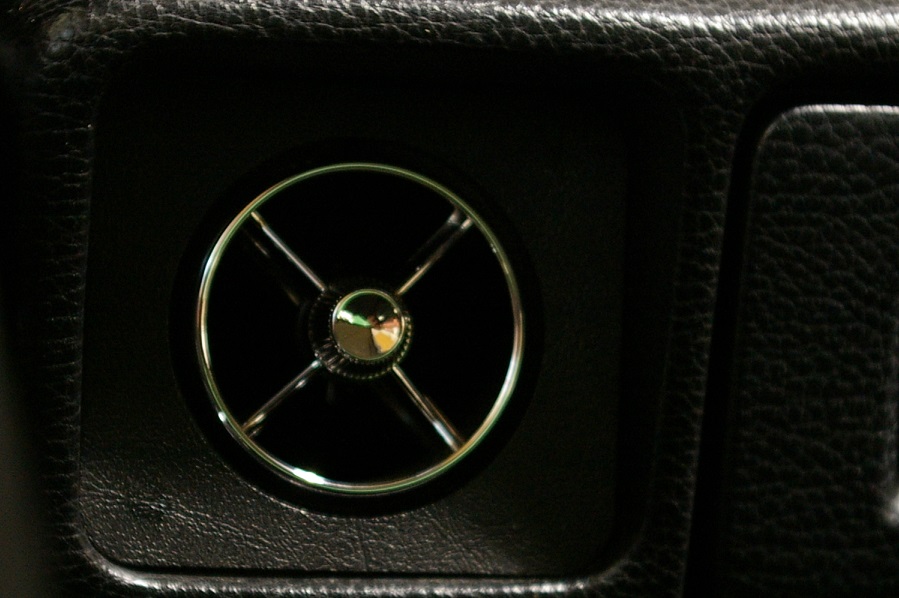
The eyeballs and control knobs were originally vacuum metallised. There are several companies in the UK offering this service, but having contacted most of them, they are only interested in new parts and runs of hundreds! I have previously tried using chrome spray paint, but never found this satisfactory. I have tried various approaches with this - thin coats, thick coats, over-lacquering... nothing seems to give a suitable finish!
I found a company who uses various chemicals, (one containing silver nitrate) and repeatedly floods the surface with these. 99% of the material that sticks to the surface evaporates! This gives a tough, mirror chrome finish. The cost of this process is relatively high! I sent the vents off, several weeks later they returned.
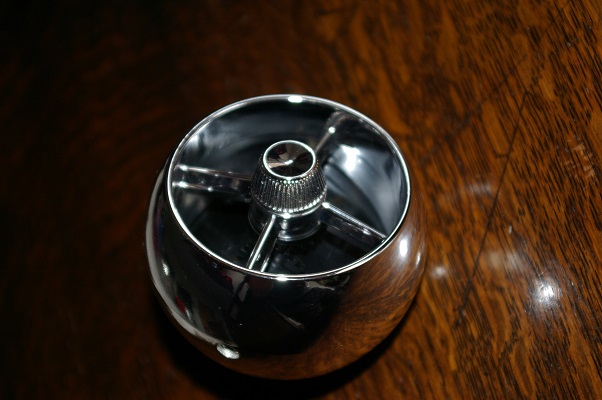
The finish is excellent! The knobs no longer fitted due to the thickness of the finish, but a little attention with the needle files soon had these back in place. I put the vents back together. The eyeballs were quite tight in the sockets, partly due to the slightly thicker finish and partly due to the felt rings in the sockets having swelled due to me washing them! Once together I used two small blobs of epoxy resin in the spaces at the ends of the lugs to stop the sockets twisting apart, rather than using cyanoacrylate. This should be easier to remove when taking the vents apart in the future by chipping or drilling out as epoxy doesn't run into the joint. The vents have been in the car for a few weeks now, and have loosened up nicely as the felt has compressed back into place!
|
Edited by - AAA on 19 Sep 2021 08:54:21 |
|
|
|
828CC
United Kingdom
55 Posts |
Posted - 15 Sep 2021 : 20:54:57
|
| Your dedication and ingenuity are to be admired... Many thanks for sharing with us.. |
|
|
|
Topic |
|
|
|